
Picture 1. A rendering of a metallic spoon in 3D Studio MAX.
This tutorial is aimed for those who wish to learn to create 3D models of complicated objects. This is a tutorial for those who wish to practice a modeling technique before starting a more complicated project such as modeling of a human head.
In this tutorial we'll create a 3D model of a spoon like in picture 1. The spoon will be created by using a poly modeling and subdivision surface techniques. The modeling starts from a single polygon and the model is created by adding polygons to it with several different methods. The purpose of this tutorial is not to create the spoon as effectively as possible, but to familiarize you with poly modeling and the essential tools of Edit Poly modifier. This tutorial covers the use of the following tools:
- break vertex
- weld vertices
- weld edges
- copy edge
- chamfer edge
- create polygon
- cut polygon
- slice polygon
- extrude polygon
Edit Poly Sub-Object Modes
In this poly modeling tutorial we'll work in the following sub-object modes of Edit Poly modifier:
When modeling with polygons, it's important to understand the meaning of different sub-object modes and to be able to switch between them when necessary. Keyboard shortcuts for the sub-object modes mentioned above are 1-4.
3DS Modifiers
As an addition to Edit Poly modifier this poly modeling tutorial covers the use of the following modifiers:
Symmetry - modifier can be used to mirror an object and therefore half of a symmetrical object can be created automatically.
Meshsmooth - modifier smoothens a 3D model. In practice it means that we can crate a coarse model and let the Meshmooth modifier to smoothen it by creating a subdivision surface out of it.
Useful Keyboard Shortcuts in 3D Studio MAX
While creating a 3D model it's often helpful to switch between wireframe rendering and shaded rendering (Smooth+Highlights) and to make edges of the objects visible. Keyboard shortcuts for these functions are:
F3 - Smooth+Highlights rendering / Wireframe rendering
F4 - Make edges visible (only applies to shaded rendering)
1. Begin Poly Modeling
 Picture 2. The poly modeling starts with a single four-sided polygon.
The modeling starts from the handle of the spoon.
- Create a Plane object in the Left view according to picture 2.
- Set the width and length segments of the Plane to 1. Now you have created a single four sided polygon. This way the modeling starts from a single polygon.
2. Modeling With Edit Poly
 Picture 3. New polygon is created by cloning an edge.
- Add Edit Poly modifier to the Plane object.
- Activate the edge sub-object mode in the Edit Poly modifier.
- Select the left-hand edge and create a new polygon by cloning it to the left according to picture 3. (An edge is cloned by moving it while pressing Shift in keyboard.)
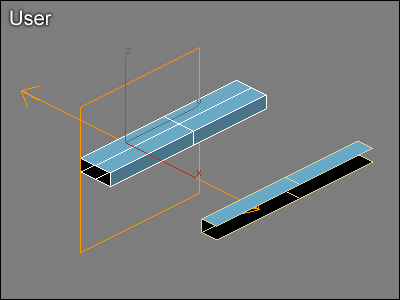
3. New Polys by Cloning Edges
 Picture 4. The 3D model is created poly by poly.
Meshsmooth & Symmetry Modifier
At this stage its a good idea to take advantage of the Symmetry modifier and the Meshsmooth modifier.
4. Clone the 3D Model
Let's clone the 3D model and add modifiers to it:
- Deactivate the edge sub-object mode and clone the whole 3D model by moving it while pressing Shift in keyboard.
- In Clone Options dialog set the object to be a Reference and click OK.
5. Add the Symmetry Modifier
 Picture 1. The Symmetry modifier is added to the reference.
- Add the Symmetry modifier to the reference object.
- Select suitable mirror axis in the Symmetry modifier.
- Activate the Mirror mode in the Symmetry modifier and move the mirror plane to the edge of the model. The model should now look like in picture 1.
6. Add the Meshsmooth Modifier
 Picture 2. The Meshsmooth modifier is added to the reference.
- Add the Meshsmooth modifier to the reference object.
- Set Iterations to 2. The model should now look like in picture 2.
7. Continue Polygon Modeling
 Picture 3. Four new polygons are created by cloning edges.
- Activate the edge sub-object mode and select an edge from the end of the model and create four new polygons by cloning edges according to picture 3.
- Place the new polygons according to picture 3.
8. Create New Polygons by Cloning Edges
 Picture 4. Three new polygons are created.
- Select three edges from the lower part of the spoon and create three new polygons by cloning the selected edges.
- Place the new polygons according to picture 4.
9. Weld Vertices Together
 Picture 5. Vertices are welded together with Target Weld.
10. Move Vertices
 Picture 6. Vertices are moved to the center of the spoon.
11. Shape the Spoon
 Picture 7. The bowl of the spoon is shaped by moving vertices down.
Edit Poly - Adding Details
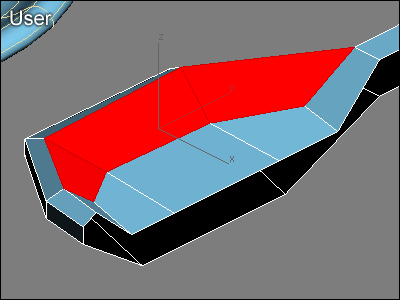
12. Add Details With Chamfer
 Picture 1. Six edges selected.
 Picture 2. Chamfer function creates new edges (Edit Poly).
The edge of the spoon is too round. Let's add some definition to it with the Chamfer function. Chamfer function can be used to chamfer an edge so that it divides into two edges:
- Activate the edge sub-object mode in Edit Poly and select six edges from the upper part of the spoon according to picture 1.
- Click on Chamfer button. Click and hold the mouse button on top of some of the selected edges and move the mouse. The result should look like in picture 2.
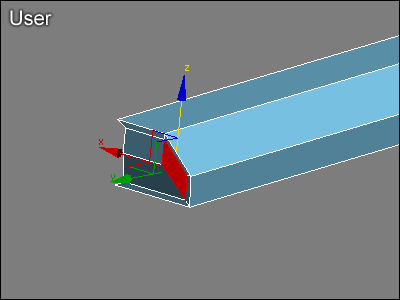
13. Break Vertices
 Picture 3. Break function creates new vertices (Edit Poly).
- Activate the vertex sub-object mode in Edit Poly and select two vertices according to picture 3.
- Click Break button in Edit Poly modifier. Break function divides the common vertex of the polygons. As a result there are as many vertices as there are corners of the polygons.
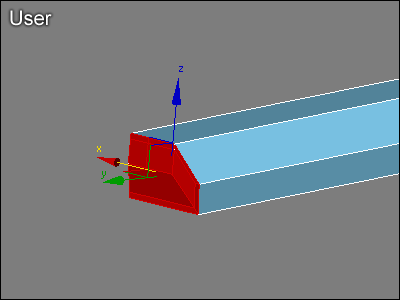
14. Move Vertices
 Picture 4. Vertices are separated and moved with Edit Poly modifier.
15. Weld With Target Weld
 Picture 5. Vertices are welded with Edit Poly's Target Weld function.
16. Cut Polygons
 Picture 6. Cutting polys with Edit Poly modifier.
- Activate Cut function in Edit Poly
- Click on the edge of the polygon
- Click on the opposite edge of the polygon
- Right click to deactivate the Cut function
17. Move Vertices
 Picture 7. Moving vertices with Edit Poly modifier.
18. Create New Polygons
 Picture 8. New polygons with the Create function (Edit Poly).
- Click the Create button in Edit Poly
- Click on the vertex where the first corner of the polygon will be
- Click on the vertex where the second corner of the polygon will be
- Click on the vertex where the third corner of the polygon will be
- Click twice on the vertex where the fourth corner of the polygon will be
19. Shape the Spoon
 Picture 9. Shaping the lower part of the spoon.
- Orbit the user view so that you can see the bottom of the spoon.
- Activate the vertex sub-object mode in Edit Poly and shape the lower part of the spoon by moving vertices according to picture 9.
20. Definition With Slice Plane
 Picture 10. Adding definition with the Slice function (Edit Poly).
- Activate the polygon sub-object mode in Edit Poly and select four polygons according to picture 10.
- Activate the Slice Plane function. A yellow plane appears. If necessary move and rotate the yellow plane according to picture 10.
- Click the Slice button. The selected polygons are now sliced according to the slice plane. Finally click the Slice Plane button again to deactivate it.
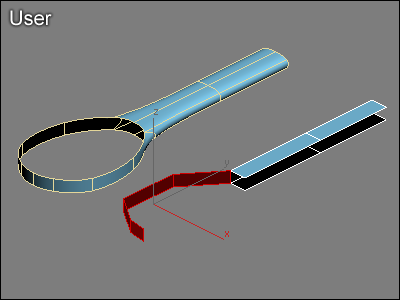
21. Shape the Handle
 Picture 11. A curved handle of the spoon.
22. Polygons With Scale Function
 Picture 12. The end of the spoon.
- Orbit the user view to match picture 12, activate the edge sub-object mode in Edit Poly and select four edges surrounding the hole in the end of the spoon.
- Activate Scale function in the top panel. Press Shift in keyboard and create new polygons by cloning the selected edges with the scale tool. The result should be similar to picture 12.
23. Clone Edges
 Picture 13. Polygons by cloning edges.
24. Edit Poly's Target Weld
 Picture 14. Edges are joined with the Target Weld function (Edit Poly).
- Activate the edge sub-object mode and Target Weld function in Edit Poly.
- First click on the lower edge and then click on the upper edge. Edges are welded together according to picture 14. Finally click on Target Weld button again to deactivate it.
25. Fill the Hole
 Picture 15. The hole is filled with the Create function (Edit Poly).
26. Move Vertices to the Center
 Picture 16. Vertices are moved to the center of the spoon.
- Switch to the Back view and activate the vertex sub-object mode in Edit Poly.
- Select three vertices in the end of the spoon and place them in to the center of the spoon according to picture 16.
27. Edit Poly's Extrude
 Picture 17. Polygons in the end are selected.
 Picture 18. The handle of the spoon is extended.
- Activate the polygon sub-object mode in Edit Poly and select all seven polygons from the end of the spoon according to picture 17.
- Click on the Extrude button. Click and hold the mouse button on top of the polygons and move the mouse.
- Place the new polygons according to picture 18.
28. Remove Unnecessary Polys
 Picture 19. Unnecessary polygons.
29. The 3D Model of a Spoon is Complete
 Picture 20. The structure of the complete 3D model of the spoon.
Now the 3D model of the spoon is complete and it's structure should match the structure of the spoon in picture 20. Finalize the spoon by moving polygons, edges and vertices. View the model from all angles, fix errors and shape the spoon to your liking.


0 comments:
Post a Comment