Wednesday 15 June 2011

Using The Gaussian Blur Filter In Photoshop


Gaussian Blur is a filter that blurs an image. But it’s also the math behind the Feather command, drop shadows, and everything that is soft in Photoshop. Watch this video and learn why Gaussian Blur is so important.

To View Video Click On Read More Button Below.........

Rockstar Poster Design

rockstar Rockstar Poster Design

This time we will show you how to create colorful rockstar poster in photoshop. In this tutorial we will use plenty of various photoshop techniques. Tutorial is pretty complex, so you will need to carefully follow each step of this tutorial. As you can see from final image preview, we will create awesome effect using usual photo and your photoshop knowledge. So, enough to talk, lets start to learn.

Lighting Effects in Photoshop

Lighting Effects in Photoshop Lighting Effects in Photoshop

Lighting effects can make or break any digital artwork. When done properly, lighting can add visual impact, draw the viewer’s eye, convey depth and emotion, and tie together all the elements of the piece for a quality finished result. However, achieving brilliant lighting is not always an easy task, particularly for newer digital artists. Perfecting contrast, color variation, sharpness and depth will help make your digital art more enticing.
In this tutorial, you’ll learn the essential process of achieving brilliant lighting effects in Photoshop. Using default brushes, blending options and a few stock images, you’ll learn step by step a variety of techniques that you can use in your own digital artworks to achieve professional results.
click to continue

Metal Text Under 12 O’clock Spot Light

Metal Text Under 12 O’clock Spot Light Metal Text Under 12 O’clock Spot Light

You will learn how to create a metal text which is illuminated from above, casting shadow. Basic transformations, some filters and actions will be covered through out this tutorial. Have fun.
Create a new document which is 900 pixels wide, 600 pixels high and at a resolution of 300 pixels/inch. Fill the “Background” layer with color #332222. Pick white as your Foreground Color. Get the Type Tool and type “AWESOME”. Set font to Caviar Dreams and Font Style to Bold, set Font Size to 36pt.
click to continue

3D Layered Text Effect in photoshop

3D Layered Text Effect 3D Layered Text Effect
You’ll learn how to create a 3D text effect using actions, basic transform operations and filters. This is an intermediate level, approximately 2 cups of coffee long tutorial.
Let’s start by creating a new document that is 1000 pixels wide and 600 pixels high at a Resolution of 300 pixels/inch using RGB Color Mode. Fill the “Background” layer with 65% Black. Get the Horizontal Type Tool and type “6PX”. I’m using Bauhaus 93 font. Set Font Size to 78 pt, Tracking to 80 and Color to black.
Now we’ll center the “6PX” layer, this will be neccessary creating the light rays later. Go to the Layers Palette and select both layers. Go to Layer > Align > Vertical Centers, then go to Layer > Align > Horizontal Centers.
click to continue

Dodge and Burn With Photoshop Video Tutorial


Photoshop offers two tools that paint with luminance: The dodge tool paints in brightness, the burn tool paints in darkness. And  they’ve gotten so much better in Photoshop CS4.

To View Video Click On Read More Button Below.........

Create a Dark and Surreal Poster

Create a Dark and Surreal Poster Create a Dark and Surreal Poster
Start off with the creation of your document and, in this case 1200×1600. If you want to print this you might want to work in CMYK mode, a higher resolution and also 300DPI. You need to make the image black and white pressing Command + Option + Shift + B (Ctrl + Alt + Shift + B on Windows) and make the background dark. Play with the settings and make it darker then the normal settings makes it.
Duplicate the background image and darken it a bit more. Then you will apply a mask and use the Linear Gradient (G) to mask the upper part of the second background you have created. Make the lower end darker.
click to continue

Create Brushes and Brush Dynamics


Create Brushes and Brush Dynamics – Photoshop Tutorial

To View Video Click On Read More Button Below.........

Creating a Flaming Fantasy Scene

Fantasy Floating Mountain Scene in Photoshop Creating a Flaming Fantasy Scene

Create a new document sized 1000px * 1500px, leave the background layer colour as white. Load the Grass Hilltopinto Photoshop, use the Rectangular Marquee Tool to select a portion of the image
Copy and paste the selection onto our docuemnt, name this layer as “Grass land” and resize it to fit the width of our document, with roughly about half of the height
As you can see we leave a large portion the upper area for the sky, personally I think this will help later on when we add more objects on the sky and make the image look deeper.
click to continue

Working with Photoshop Smart Objects

Photoshop Smart Objects Working with Photoshop Smart Objects

A Photoshop Smart Object is a version of your original text or graphic, a sort of proxy. You can edit and re-edit a Smart Object without losing one pixel of information, and the changes you make to a Smart Object never affect the original (unless you want them to).
If you’re familiar with Illustrator or Flash, think of Smart Objects as the Photoshop cousins of Symbols. One symbol can have an infinite amount of instances, with different sizes, placements, and occurrences. If you change the source symbol, all instances of that symbol reflect that change.
click to continue

Epic Fantasy Artwork in Photoshop

Epic Fantasy Artwork in Photoshop Epic Fantasy Artwork in Photoshop

In this tutorial, i will show you the steps I took to create this epic Fantasy Style artwork “Lost in Memory” in Photoshop. I combined the meteor effect, some matte-painting tricks plus lighting effect in this tutorial. Have a try!
Create a new document sized 1400px * 800px, fill the background with black colour. Load the “Rust” image into Photoshop, select a portion of the rust texture
click to continue

Makeup Artistry in Photoshop


Sometimes you do not have access to a makeup artist, or after the shoot decide you want a splash of color, this tutorial will show you how to handle both situations and more

To View Video Click On Read More Button Below.........

Create 3D type art using Photoshop CS5

Create 3D type art using Photoshop CS5 Create 3D type art using Photoshop CS5

The new 3D tools in Photoshop CS5 are more advanced than ever. In this tutorial we will use the new Repoussé tool to extrude some text in a way previously only possible in a full 3D application.
As well as exploring the capabilities of this exciting new feature, we will explore the traditional 3D settings to get the most out of the different material and rendering options.
By using Photoshop’s blending modes and masks we can quickly build up different effects and play with colours in a way that would be far fiddlier and more time-consuming in a 3D program.
click to continue

Colorfully Mixture Text Effect

Colorfully Mixture Text Effect Colorfully Mixture Text Effect
Let’s start by creating a new document which is 1000 pixels wide, 600 pixels high and at a resolution of 300 pixels/inch. Fill the “Background” layer with 75% grey. Get the Type Tool and type “AURA”. Set the font to Comics.
Set font size to 40 pt and Tracking to 60. Actually the font you’re using doesn’t really matter, it will be guiding us to draw each letter roughly from the scratch.
Create a new layer named “Text”. Get the Pen Tool, choose Paths. Draw paths over the letters as in the below image. Each letter should be a seperate path so, after completing one letter, Command-click outside the path before starting the other.
click to continue

Creating Photomontages

Create gorgeous photomontages Creating Photomontages
Taking a picture of a pretty girl and giving it the wow factor with some clever details is one of the most popular uses for Photoshop. In this tutorial, Photoshop guru Rob Shields shows how to execute the style with real flair, applying digital painting techniques, compositing and layer masks to stunning effect.
We will explore how layer masks can be used to refine the dripping paint effect and why digital painting is essential for cutting out the model’s hair successfully.
click to continue

Fashion Inspired Photo Illustrations

fashion inspired photo illustrations Fashion Inspired Photo Illustrations
Take one alluring fashion image – and add to its mystery using some clever photomontage techniques. In this tutorial, up-and-coming creative Bram Vanhaeren shows how you can transform fashion photography into edgy, enigmatic illustrations in just a few steps.
You’ll create and layer textures, vector elements and little doodles to draw the viewer’s attention and keep them noticing little details. Bram shows how to use the Warp tool to seamlessly blend elements, and to sample parts of your model’s clothing.
click to continue

Clash of the Titans Text Effect in Photoshop

Clash of the Titans Text Effect in Photoshop Clash of the Titans Text Effect in Photoshop
So, in this tutorial I will show you how to create a text effect inspired by the Clash of the Titans posters and artworks. We will use layer styles and basic filters to achieve the effect. It will not take you more than 45 minutes to achieve the effect, but the outcome is really cool.
Let’s start our design in Illustrator, it’s easier to get the text done in Illustrator, even though you can do that in Photoshop as well. When I saw the official Clash of the Titans poster I knew that font, it was the Bank Gothic, or the Bank Gothic is very similar.
click to continue

Refine Edge in Photoshop CS5


Photoshop CS5 brings a very welcome change to Refine Edge. Edge Detection will help with much more detailed selections such as hair or fur

To View Video Click On Read More Button Below.........

Gradient Effect on Black & White Photo

Gradient Effect on Black White Photo Gradient Effect on Black & White Photo
Today, I’m gonna share a really short and simple tutorial on how to spice up your black and white image. Taking advantage of gradient layer, and blending modes in Photoshop, we’ll add some colors that’ll sure make your B&W photo a bit more interesting. So, read fast, and you’ll accomplished this effect in less than two minutes…probably less if you read even faster.
Open your black and white image in Photoshop. What? you don’t have one?..well, you can try any of these tutorials to get a B&W image out of a colored one:
click to continue

Intelligent Spot Healing in Photoshop CS5


A video of one of the great new features in Adobe Photoshop CS5. ‘Content aware filling’.

pot Intelligent Spot Healing in Photoshop CS5

To View Video Click On Read More Button Below.........

Remove Portrait Blemishes with Photoshop CS5


In this video I show you how to remove blemishes, acne, and pimples. The next video will be regarding a custom CS5 feature.

skin Remove Portrait Blemishes with Photoshop CS5

To View Video Click On Read More Button Below.........

Tuesday 14 June 2011

Replace the Sky With Photoshop


A step-by-step intermediate tutorial showing you how to replace a sky using Adobe Photoshop CS5 or CS4. In the tutorial I am using CS5, but the steps will be the same for earlier versions of Photoshop.

sky Replace the Sky With Photoshop

To View Video Click On Read More Button Below.........

Macbook Pro Illustration in Photoshop

Macbook Pro Illustration in Photoshop Macbook Pro Illustration in Photoshop
In this tutorial, I will demonstrate how to create a MacBook Pro in Photoshop. Let’s get started!
Now you will need to find a photo to use a reference. To do this, just head over to Google and run an image search. Once you’ve found a photo, place it into your document by going to File > Place, then center it as shown below.
click to continue

How to batch resize / save as jpg in PhotoShop


A beginner tutorial showing you how to resize and resave a batch of images using Adobe Photoshop and Adobe Bridge


batch How to batch resize / save as jpg in PhotoShop

To View Video Click On Read More Button Below.........

Editing a Picture Onto A Wall


An intermediate Adobe Photoshop tutorial showing you step by step how to put an image onto a wall in a picture of a room


wall Editing a Picture Onto A Wall

To View Video Click On Read More Button Below.........

Brush Settings, Flow vs Opacity & Air Brush


An in-depth tutorial using Adobe Photoshop CS4 showing and explaining the difference between the Flow, Opacity and Air Brush settings for the Brush tool.

brushes Brush Settings, Flow vs Opacity & Air Brush

To View Video Click On Read More Button Below.........

Hair Makeover With Photoshop


An intermediate step-by-step make-over tutorial covering how to edit and create thick full bodied hair using Adobe Photoshop CS4. This tutorial shows you the full process of editing from start to finish.

hairs Hair Makeover With Photoshop

Facial Retouching


Facial retouching makeover with photoshop tutorial
face Facial Retouching

How to Isolate an Image on White


A thorough walk-through tutorial showing you how to isolated an image on white in Adobe Photoshop CS4


pen How to Isolate an Image on White

Colorful Flames in Photoshop


In this tutorial, Brandon shows you how to create rainbow-colored flames in Photoshop.Create rainbow-colored flames.
flames Colorful Flames in Photoshop

Using the Gradient Tool in Photoshop


Not only can you paint a soft transition from black to white, you can also soften the transition from one image to another. The gradient tool fades, swipes, and more.

gradient Using the Gradient Tool in Photoshop

Luminance Blending With PhotoShop


Buried deep inside the Layer Style dialog box are two slider bars, This Layer and Underlying Layer, that let you blend pixels according to their brightness. Despite their prosaic names, these sliders rank among the most powerful features in all of Photoshop.


glow Luminance Blending With PhotoShop

Using Hue and Saturation in Photoshop


Hue/Saturation not only spins colors and intensity values, it lets you modify one color independently of all others. And it does so in such a credible way, you would never know it was there. Perfection.


hue Using Hue and Saturation in Photoshop

Using Layer Comps in Photoshop


Layer comps let you assemble multiple image variations or even independent pieces of artwork inside a single Adobe Photoshop file. The Layer Comps palette gives you the freedom to explore.

aa Using Layer Comps in Photoshop

To View Video Click On Read More Button Below.........

Draw a Trophy Icon

trophy Draw a Trophy Icon
Create a new layer, name it ‘Base 1′. Select the Elliptical Marquee Tool (M), now go to Options bar. Style: Fixed size, Width: 734px, Height: 190px.
Now click anywhere on the canvas and place it as it shown. Apply the following layer styles.
Click to continue

Photoshop Calculations


Calculations lets you merge two channels to create a new alpha channel. Learn it: It’s the backbone of masking.
calc Photoshop Calculations


Design a Video Game Interface Window in Photoshop

Design a Video Game Interface Window in Photoshop Design a Video Game Interface Window in Photoshop
One of the most important aspects of playing a video game is how information is presented. How the graphics are presented makes a major difference in how the players will perceive the game during play. In today’s tutorial we will demonstrate how to design a video game interface window.
During the process we will show how to manually draw certain aspects, apply layer styles, textures, and even how to incorporate Adobe Illustrator. Let’s get started!
Click to continue

Holy Mountain Scene – Photoshop Tutorial


Design a surreal landscape with this video tutorial showing you how to create a godly scene in Adobe Photoshop

To View Video Click On Read More Button Below.........

How to Extract and Cut Out Hair from a Photo in Photoshop


A few tricks on how to isolate and extract hair from a background photograph so that you can then composite the image on to a new background
To View Video Click On Read More Button Below.........

Creating Ice Type Text in Photoshop


In this video tutorial we will share a method for creating an icy cool type effect. We will combine the Wind filter and some quickly applied layer effects in photoshop to create this chilly effect, including fully formed icicles.
To View Video Click On Read More Button Below.........

Golden Type Text in Photoshop


How to create gleaming gold from ordinary type. Created with photoshop’s Layer Effects, your treasured text can be edited at any moment

To View Video Click On Read More Button Below.........

Branding Type on a Texture With Photoshop


How to virtually brand your chosen type into any surface imaginable in photoshop.
To View Video Click On Read More Button Below.........

Spectacular Splatter Design


Photoshop tutorial about how to make a stunning design using custom photoshop brushes.Create your own graphic collages.


To View Video Click On Read More Button Below.........

Abstract Artwork with Clone Stamp Tool

Abstract Artwork with Clone Stamp Tool in Photoshop Abstract Artwork with Clone Stamp Tool
Steps  to Create Awesome Abstract Artwork with Clone Stamp Tool in Photoshop.
The main focus of this tutorial is the use of clone stamp tool and how to combine it with Pen Tool to create abstract patterns quickly and effectively

Create a High Pass Photoshop Action

Create a High Pass Photoshop Action for Epic Photographs Create a High Pass Photoshop Action
This tutorial uses the High Pass Filter in combination with a few other techniques to create a dramatic result. You can follow along or just skip to the bottom to download the action and start turning your ordinary photographs into epic works of art.
The High Pass Filter in Photoshop allows you to create some very dramatic effects. Let’s use it in combination with some other effects and tweaks to create an epic Photoshop Action.
Click to continue

Grunge Snowboard Poster

Grunge Snowboard Poster for the Winter Olympics Grunge Snowboard Poster
In this tutorial we’re going to put together a cool grungy poster design for the upcoming Vancouver Winter Olympics. We’ll go over several basic Photoshop techniques and combine some basic image manipulation with some grunge text treatments to create some cool effects.

This is an easy step-by-step tutorial that even Photoshop beginners should have no problem with.
CLICK to continue

Human Scarecrow – Manipulation With Photoshop

Human Scarecrow – Manipulation Tutorial1 Human Scarecrow – Manipulation With Photoshop
For this tutorial you must know: how to use the Pen Tool to extract subjects from the background, how to use adjustment layers and how work with blend modes. It’s a medium difficulty tutorial. Enjoy.

The reason why I decided to make this tutorial is to show you how I used the techniques explained on my Manipulation Secrets series, particularly how to choose stock images and to show you practical examples of lighting and shading.
Click to continue

Create A Futuristic Photo Illustration With Photoshop

Create A Futuristic Photo Illustration With Photoshop 231x300 Create A Futuristic Photo Illustration With Photoshop
We will be doing some work with masks and implementing color and light effects to achieve the end result. If you are ready then start up Photoshop and let’s get started.

Open up the image of the dancer from the resources provided and what we are going to do first is clip out our model from the background. To isolate the model you can grab either the Pen Tool and trace or you can use a mask,
continue

Photoshop Quick Tip: Light Effect Text Button

Photoshop Quick Tip: Light Effect Text Button

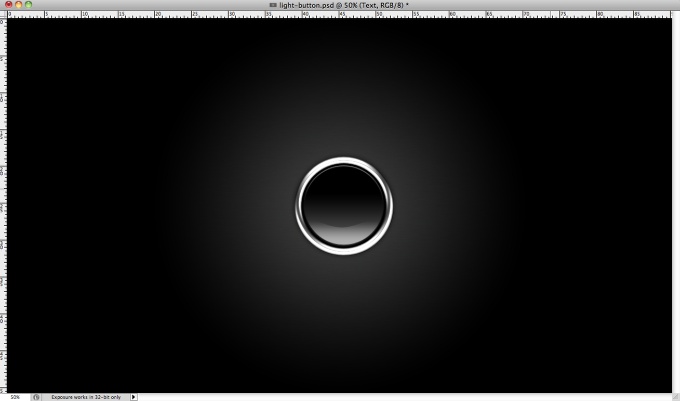
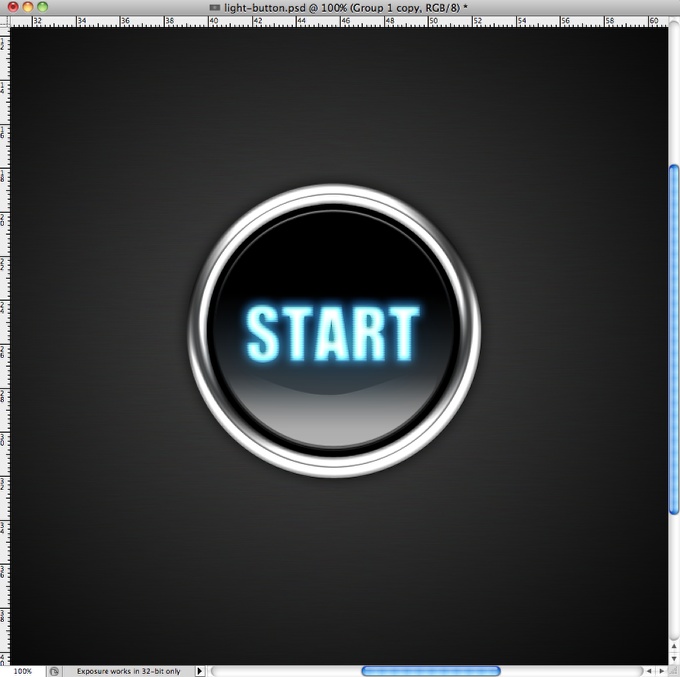
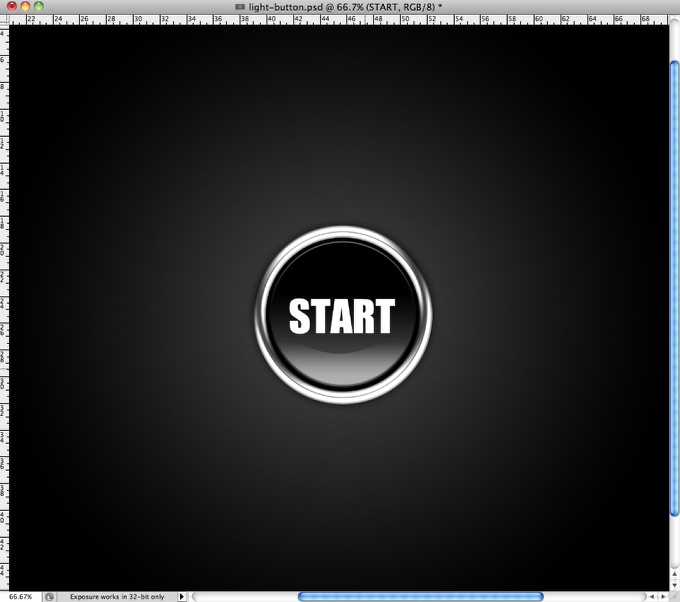
A few weeks ago I wrote a tutorial showing how to create a stylish metallic button effect using Photoshop. In that tutorial I posted to conclusions and one of them had a light effect in the text. The tutorial was well received and a lot of people wanted to know how to create that effect.

So in this tutorial or quick tip because it's more about layer styles and we will use the base of a previous tutorial, I will show you how to create a super simple light effect using only layer styles, blend modes and the blur filter.

Step 1

Photoshop Quick Tip: Light Effect Text Button

Step 2

With the Horizontal Type Tool (T) add the text you want, I typed START using Impact for the typeface. The color is not really important because we will apply some layer styles to create the effect.
Photoshop Quick Tip: Light Effect Text Button

Step 3

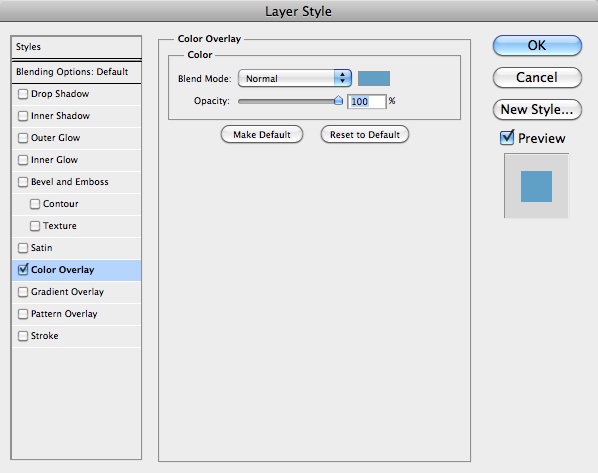
Go to Layer>Layer Styles>Color Overlay. Use Blue #5ba0c8 for the color.
Photoshop Quick Tip: Light Effect Text Button

Step 4

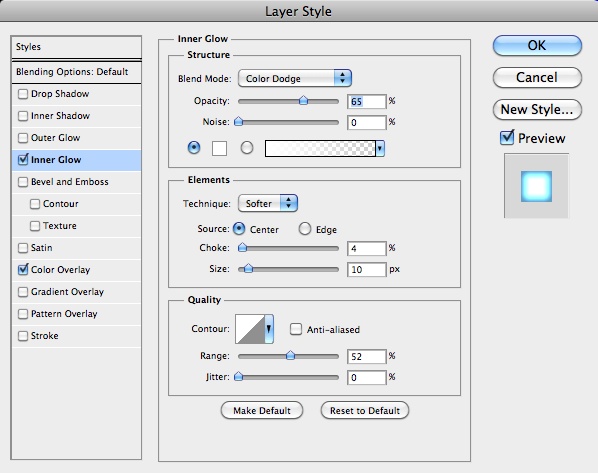
Select Inner Glow, for the Blend Mode use Color Dodge with 65% Opacity, white for the color, Center for the Source, 4% for the Choke and 10 pixels for the Size. Also change the Range to 52%.
Photoshop Quick Tip: Light Effect Text Button

Step 5

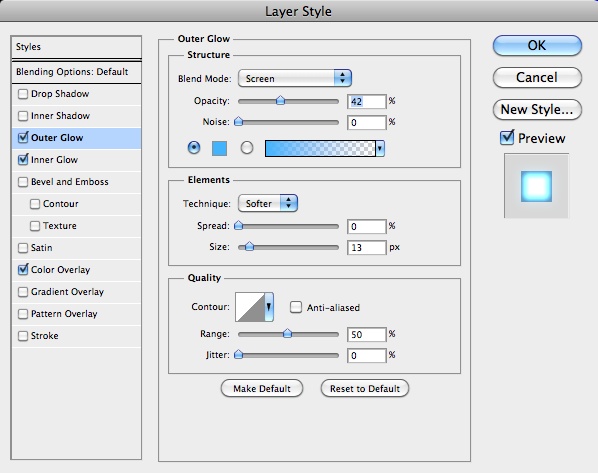
Select Outer Glow. Use Screen for the Blend Mode, 42% for the Opacity, blue (#33b5ff) for the Color, 0% for the Spread, 13 pixels for the Size.
Photoshop Quick Tip: Light Effect Text Button

Step 6

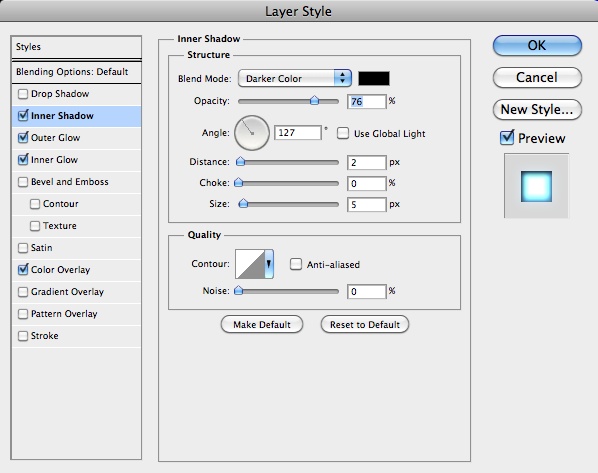
Select Inner Shadow, then for the Blend Mode use Darker Color with black for the color. For the Opacity use 76% with 127º for the Angle. For the Distance use 2 pixels, 0% for the Choke and 5 pixels for the Size.
Photoshop Quick Tip: Light Effect Text Button

Step 7

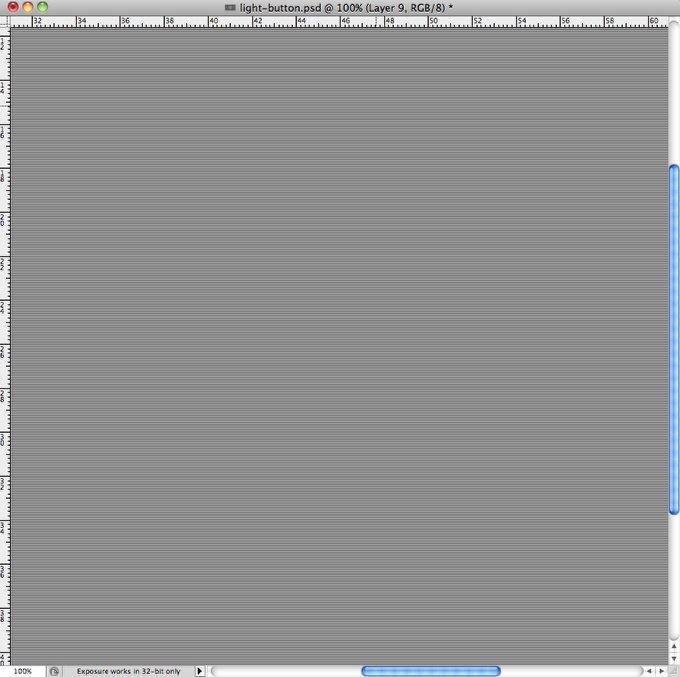
Now a very important part of the effect, create the scanlines effect. To do that is pretty simple, just create a new document with 10 pixels of width and 2 pixels height. Then create a black rectangle of 10x1 pixels so you will have one line black and another in white. After that go to Edit>Define Pattern. Name your pattern and your are good to go.
Photoshop Quick Tip: Light Effect Text Button

Step 8

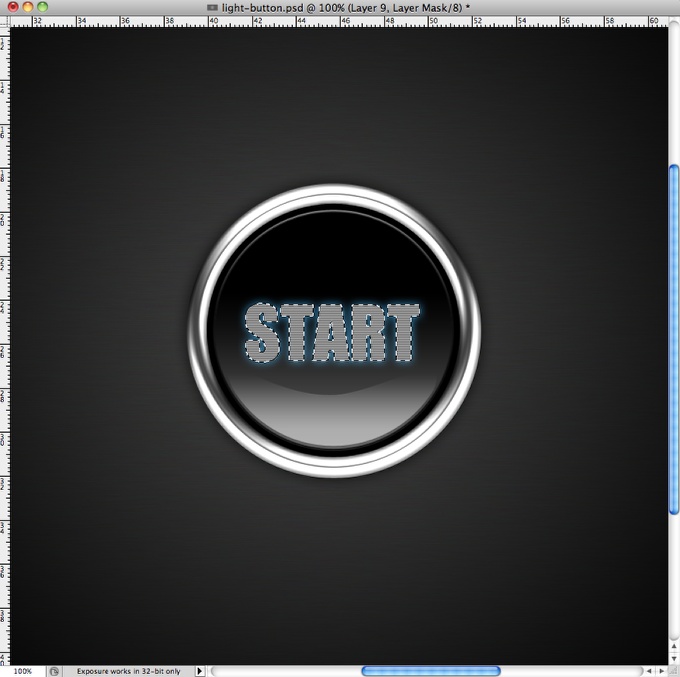
Create a new layer and fill it with the pattern background, then create a marquee selection of the text by clicking on the thumbnail of the icon holding Command (MAC)/Control (PC)
Photoshop Quick Tip: Light Effect Text Button

Step 9

Go to Layer>Layer Mask>Reveal Selection, so the pattern will be visible only within the marquee selection area. After that change the Blend Mode to Overlay.
Photoshop Quick Tip: Light Effect Text Button

Step 10

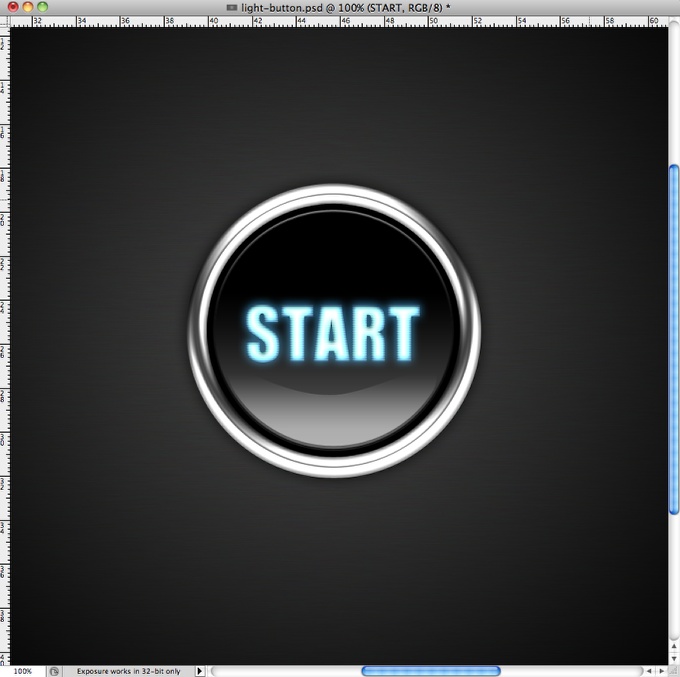
Duplicate the text layer and go to Filter>Blur>Gaussian Blur. Use 10 pixels for the Radius. Then group the layer into a folder and change its blend mode to Soft Light.
Photoshop Quick Tip: Light Effect Text Button

Conclusion

You can merge all the layers used to create the button and duplicate them twice, then apply a gaussian blur to both. For the one beneath change the blend mode to Overlay and for one at the top use screen, both at 40% Opacity. After that the light effect is pretty much done.
The cool thing about this effect is that it works amazingly well for texts, but when you have symbols with larger areas you will have to make a few tweeks in the Layer Styles, nothing that will be completely different though.
Photoshop Quick Tip: Light Effect Text Button

Filter Forge Launches 3.0 Beta and New Abdz Contest

Filter Forge Launches 3.0 Beta and New Abdz Contest

Hey everyone! More good news from Filter Forge; after the great response and high participation we got on their last contest a few months back, they've decided to run another one here to celebrate the launch of their new 3.0 beta. If you didn't catch it last time, here's the rundown on the Filter Forge software: Filter Forge is a high-end graphic software allowing you to create visual effects, enhance photos, generate textures, and process images. It features 7500+ free ready-to-use realistic and abstract textures and effects, and a powerful visual editor to create custom ones. Filter Forge can operate as a standalone application or as a plug-in for Photoshop and compatible hosts, under Windows or Mac OS X.
So what does the launch of their new 3.0 beta mean for you guys? Two things...
  1. 1. If you participate in this contest you could win a free copy of the commercial version of Filter Forge 2.0 now, and a nice discount on the 3.0 software when it goes commercial.
  2. 2. You can download the free 3.0 beta and regardless of whether or not you win this contest, submit a "bug report" to Filter Forge and they'll give you the commercial version of 3.0 for FREE when it's released. [details here]

Contest Guidelines

Similarly to our last contest, you'll be using the Filter Forge software to create your own custom filter(s) and/or use one of the 7500 filters that come with their software to create an original piece of your own. You may submit up to 5 filter examples, but you must include a before and after image for each filter you use. The top three submissions will be awarded a free license for their downloaded Filter Forge software, a value of $399!

How to Participate

A free fully-functional 30-day trial version of Filter Forge 3.0 beta is available on their website. CLICK HERE to download that free trial so you can use it to create your submission according to the guidelines above.

Some Awesome Examples From The Filter Forge Gallery:

Snake scales created with Filter Forge.
Modeled in Hexagon, textures created with Filter Forge.