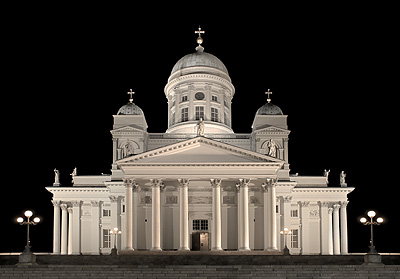
Picture 1. The final result of Photoshop HDR imaging.
This is an article about Photoshop HDR imaging. The following HDR workflow is explained in detail:
- Merging photos to an HDR image
- Processing the HDR image
- Tone Mapping
Merging Photos to an HDR Image
Creating an HDR image in Photoshop is very simple:- Click Merge to HDR... in the menu (File > Automate > Merge to HDR...)
- Click Browse button and select all the photos you want to use (at least two). The photos can be for example in JPEG or RAW format.
- Click OK and Photoshop merges the photos automatically. This operation might take some time If you are merging many high resolution raw photos. (According to my experience it can take ½-3 hours when Intel Core 2 Duo 1.8GHz merges nine 14-bit 12 megapixel raw photos.)
(One might wonder, what is the meaning of the slider below the histogram. That's just for viewing the HDR image at different exposures. All the HDR image data remains intact while using the slider.)
Saving the HDR Image
After clicking OK in the HDR tool, the image is normally opened in Photoshop. At first it should be saved. An HDR photo can be saved for example to PSD or OpenEXR format. I personally use OpenEXR because it can be opened in several other programs (such as Photomatix) that support HDR imaging.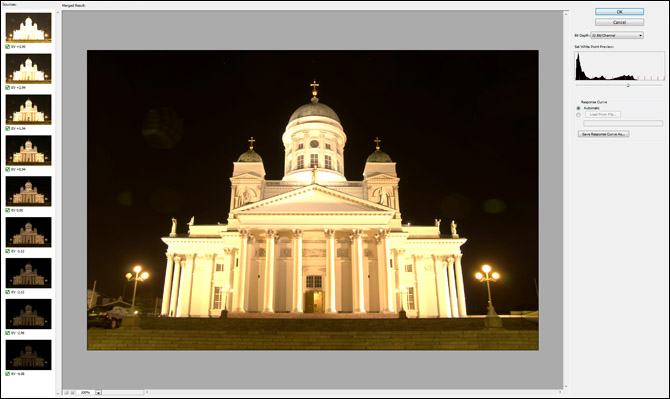 Picture 2. Merge to HDR tool in Adobe Photoshop.
Original HDR Image in Photoshop
In picture 3 you see how the original HDR image looks like in Photoshop. Let's examine it a little and set some goals. There are obviously several problems: yellow cast, perspective distortion, some barrel distortion, and distracting elements on the left side. My goal is to fix all these and create a symmetrical and simple high contrast photo with completely black sky. Picture 3. The original unprocessed HDR image in Photoshop.
Basic Clean Up
First, let's do some basic clean up to fix some problem areas. I adjusted the exposure slider (in the bottom of the HDR image) about +4EV to see the problem areas in the sky. My goal is to have completely black sky. If you look at the original image on the left (picture 4), you see several lens reflections and a few stars. I use Clone Stamp Tool and other copying methods to get rid of these (see the picture on the right). After clean up there are still some large faded lens reflections in the sky but these will be darkened to pure black later in the tone mapping process.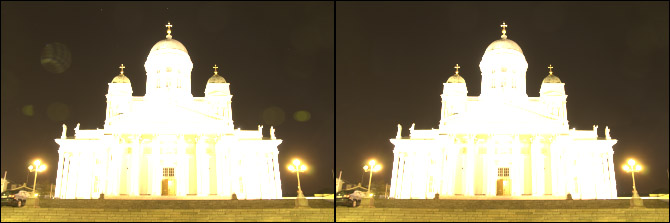 Picture 4. Basic clean up in Photoshop.
Perspective Correction
The next step is perspective correction. First I turn Grid on (View > Show > Grid) to be my guide. Then I use Perspective Tool (Edit > Transform > Perspective) to fix the perspective distortion. After that I notice that there is unfortunately some barrel distortion. Barrel distortion is somewhat tricky to fix but doable with careful use of the Warp Tool (Edit > Transform > Warp). To keep the maximum image quality, It's best to commit all transform operations at once. In picture 5 you see the image after perspective correction.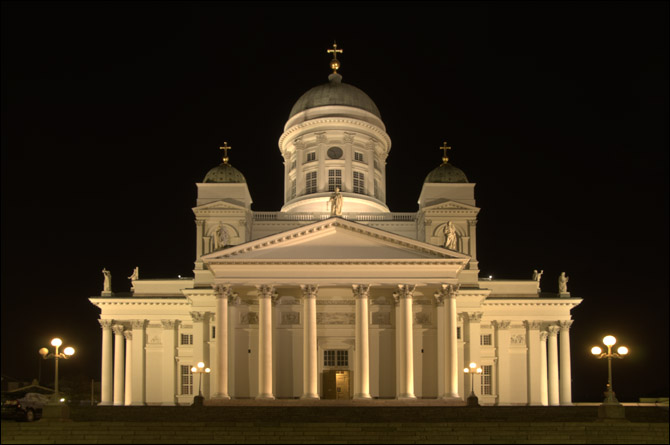 Picture 5. The perspective is corrected.
Removing Distractions and Creating Symmetry
There are some distracting elements in the lower left corner of picture 5. Next I'll use Clone Stamp Tool and other copying methods to fix that area. Now the photo is cleaner and the effect of symmetry is stronger (picture 6). Picture 6. Symmetrical and simple.
Removing Yellow / Red Cast
Now is the time to remove the yellow / red cast from the HDR photo. I do that by applying Hue / Saturation adjustment filter. I decrease the saturation of reds and yellows (picture 7).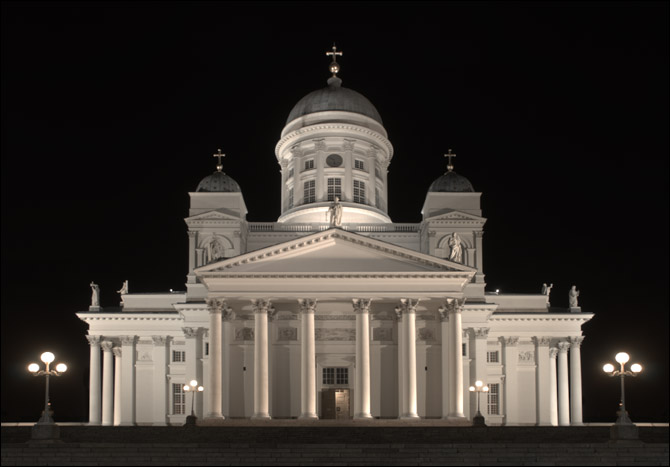 Picture 7. Yellow cast has been removed with the Hue / Saturation tool.
More Light and Less Light
There are some very dark areas (top of the domes and stairs) and some very bright areas (light poles). I can predict that these are going to problems in the tone mapping process. For example, in the tone mapping process, when I'd be adjusting the toning curve to darken the sky, I'd spoil the domes and the stairs. Similarly when I'd be brightening the church, I'd spoil the lights. The solution to my problem is local exposure adjustment that can be done manually:More Light to Domes and Stairs
- I apply Exposure (+1,5) adjustment layer to make the domes and stairs bright enough
- I fill the mask of the adjustment layer with black color (to remove the effect from the whole image)
- I choose white color and paint the mask on areas I want to be brighter (domes and stairs)
Less Light to Light Poles
- I apply Exposure (-3) adjustment layer to make the lights dimmer
- I fill the mask of the adjustment layer with black color (to remove the effect from the whole image)
- I choose white color and paint the mask on areas I want to be darker (domes and stairs)
(One tone mapping method is to expose the whole image manually and then just do the actual tone mapping with Exposure and Gamma method. However, I won't need more manual exposure control with my example photo.)
 Picture 8. Domes and stairs are made brighter and lights are made dimmer.
Tone Mapping
Now the image is ready for tone mapping. I did a lot of Photoshop processing before the actual tone mapping. The reason is the fact that when working on HDR photo, one can execute radical color correction operations without losing any information (because of the high dynamic range). I recommend doing all color correction before tone mapping and also to save the image just before tone mapping.In Photoshop, the tone mapping process is started by converting the image mode to 8-bit or 16-bit:
- I click: Image > Mode > 16 Bits/Channel. This opens Photoshop's HDR Conversion tool.
- There are four different tone mapping methods available in Photoshop. I choose Local Adaptation method because that's the only one that let's me manually adjust the toning curve (I click on the small arrow to see the toning curve).
 Picture 9. The default settings of local adaptation.
Local Adaptation and the Toning Curve
Take a look at picture 10. On the left you see the default toning curve which produces picture 9 and on the right you see adjusted toning curve that produces picture 11. How to modify the toning curve? Well let's inspect the histogram for a while. The steep mountain on the left represents the pixels of the sky and the mountains in the middle represents the pixels of the church. I want to achieve two things: black sky and good contrast to the church. The curve on the right does just that. All the pixels on the left side of the left control point become completely black. The right control point is moved to the left just where the "mountains" start. This means that the brightest pixels of the HDR photo will become almost white. These two adjustments also make the curve really steep which equals to high contrast. Picture 10. On the left: The default toning curve. On the right: Toning curve adjusted for high contrast.
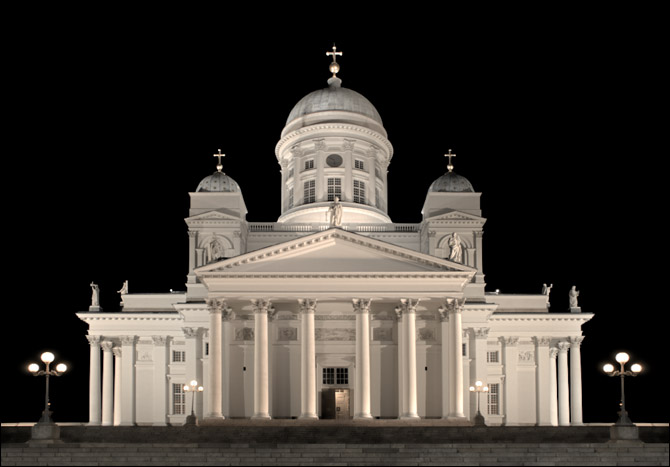 Picture 11. 16-bit image after Photoshop HDR conversion.
Sharpening
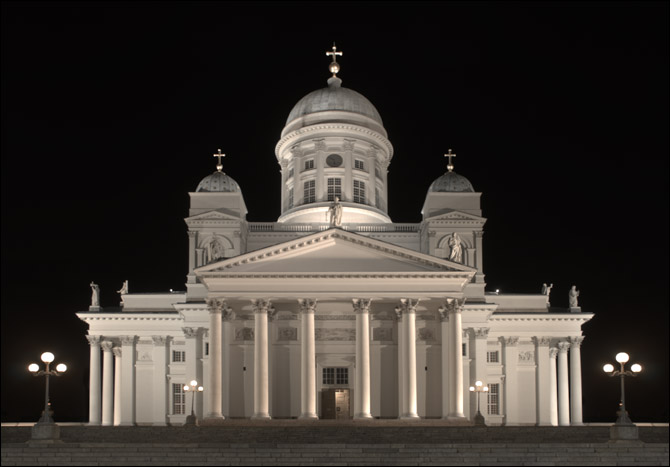
The last thing to do is sharpening. I convert the image to a smart object and apply Smart Sharpen filter to it. In picture 12 you see the final sharpened photo.
Picture 12. The Final sharpened photo.


0 comments:
Post a Comment